Type: Article -> Category: Actionable AI
Is it possible to run your own AI using VirtualBox and Ubuntu?
Publish Date: Last Updated: 10th November 2025
Author: nick smith- With the help of CHATGPT
I have been looking into implementing AI into my website and whilst there are many out the box options, almost all of them require paying a subscription once you have used up your free credits. This could also become costly if lots of people start to use your AI. So rather than tie myself down to a specific subscription I thought it was about time to dive into hosting my own AI and using this to power an AI avatar on my website.
To see how difficult this would be without paying for a dedicated server setup I decided that I would see if I could get AI running on a virtual machine using VirtualBox.
Update (27/04/25)
If you are looking to run your own AI image generator then check out our new article on generating local AI Images. You will need a GPU with at least 6GIG of Ram that supports CUDA. Read the full article.
So, can you run your own AI on a virtual machine?
Yes, you can, and it is actually very easy to setup but and this is a big but, the speed will vary depending on your hardware and the limitations of VirtualBox, but it is still practical enough to be able to start testing with.
Getting AI to run on a virtual machine.
Note: If you have a dedicated machine with a powerful GPU then you can run AI from this machine, and it will be fast enough to work with. You can use the information within this article to run it on a dedicated machine.
I am only running it on VirtualBox because I have a windows laptop that I use and it is my main machine. I did not want to load it directly onto the machine in case I got it wrong and damaged my system. Hence why VirtualBox is so handy because you can spin up virtual machines.
For this exercise, I am using a Lenovo Legion i7 laptop with a NVidia GEFORCE RTX GPU. Windows (11)
Step 1
Get Virtual Box - https://www.virtualbox.org/wiki/Downloads and download the appropriate package (Windows Host)
Step 2
Install Virtual Box – Follow the default setup procedure as recommended by the software.
Step 3
Head over to Ubuntu and download the latest ISO file for Ubuntu Server - https://ubuntu.com/download/server (At time of publish Ubuntu 24.04.1 LTS). Make a note of where you download this file to, as you will need it when you create a server.
Step 4
Get the best out of your GPU – VirtualBox is not great at supporting GPU pass through but there are some things you can do to improve the experience.
In windows go to settings (Win + I)
Go to Display settings and select the Graphics Option
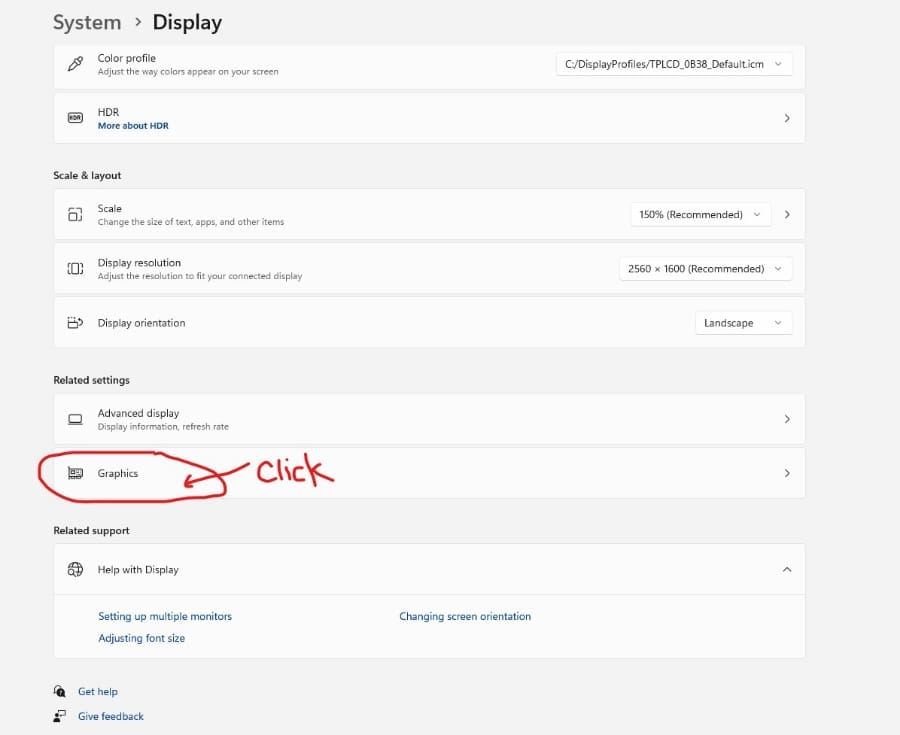
Under custom options for apps click on the browse button
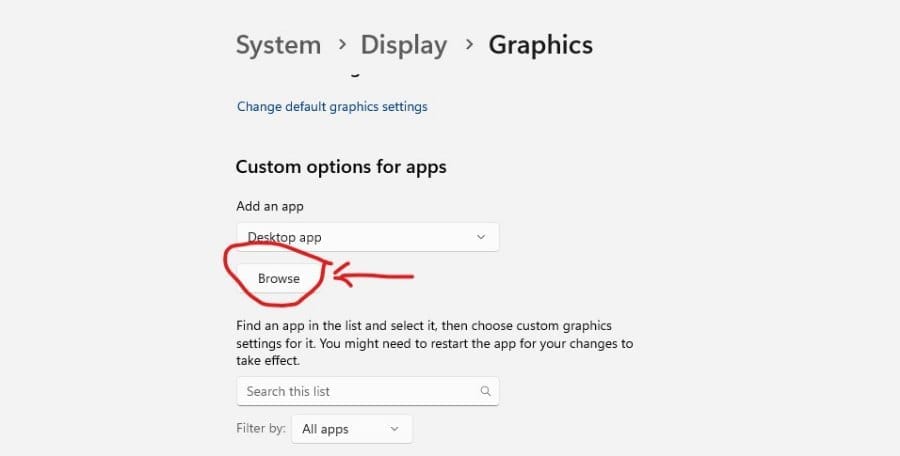
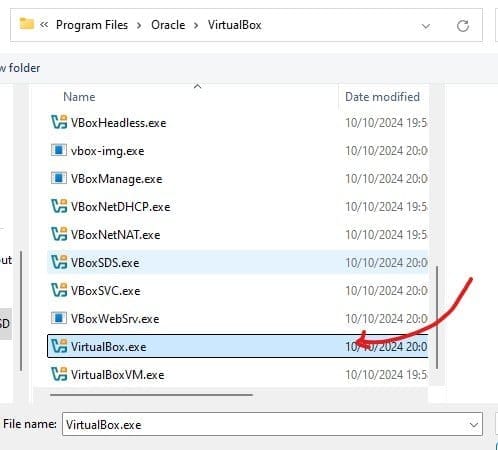
Browse to the Virtual Box folder and select Virtualbox.exe
Select your GPU
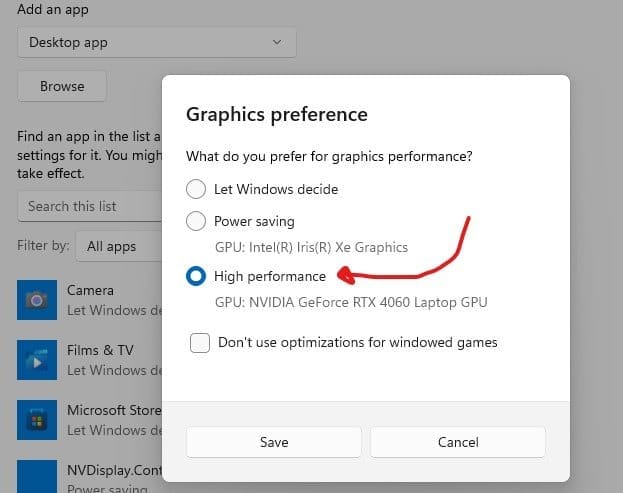
You are now set to use your Laptops GPU for the processing – Note whilst this will considerably speed up the process, it is still not instant or even close. For that you are going to need a machine with a high-end GPU
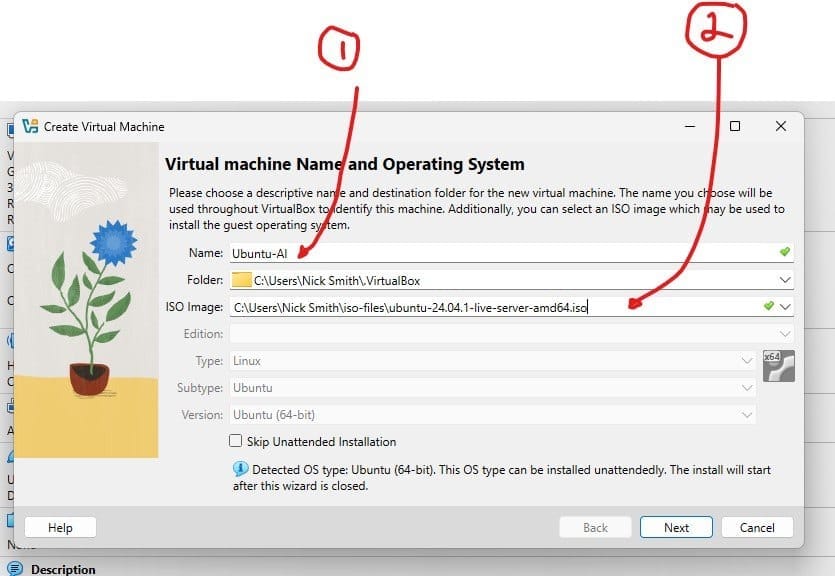
Open VirtualBox and click on the "New" option

Add the following information
1 – Name your server
2 – Remember that ISO file we downloaded? Navigate to the folder and select the file and then press Next.
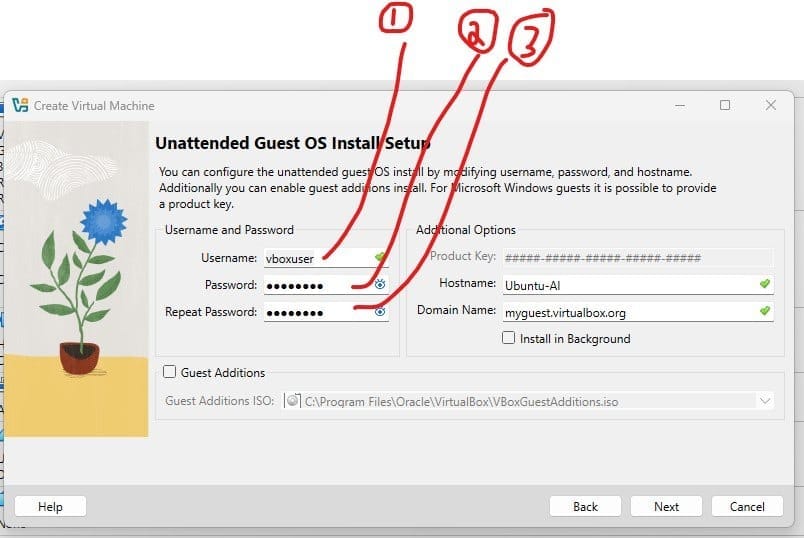
Create the login Details so you can get into the server
1) Create a username
2) Create a password
3) Confirm password and then press Next
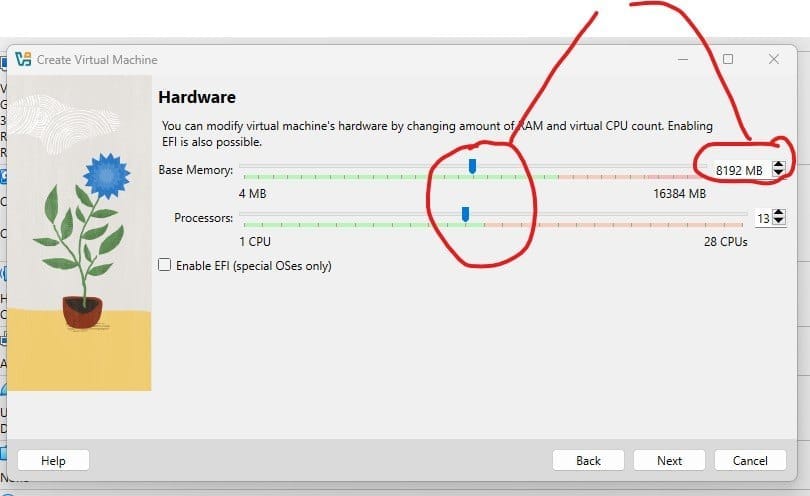
Set up the Hardware.
1) Base Memory – To get the AI to work you need at least 5.5 Gig of Ram.
2) Set Processors – Set the max without heading into the red and press Next
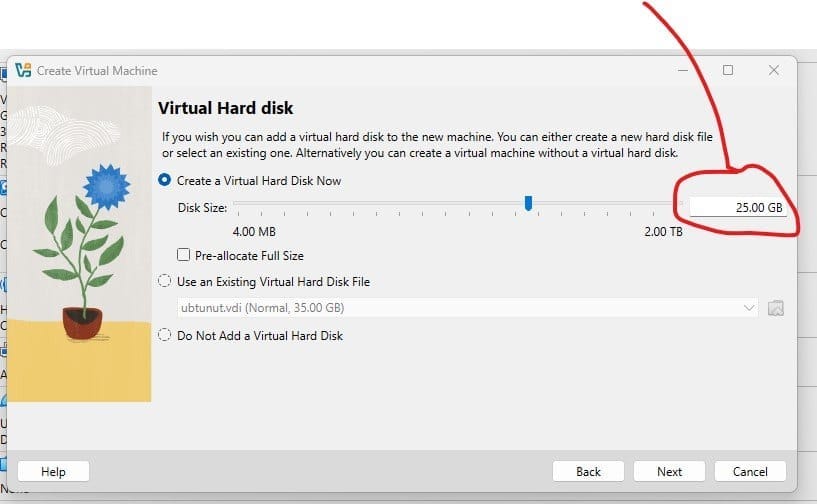
Set the Virtual Disk size – 25 Gig should be plenty to start with and then press Next
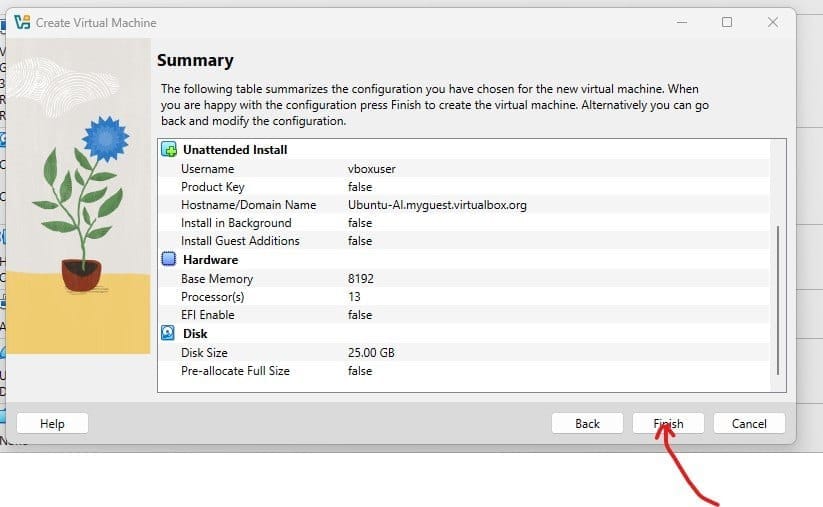
Check the summary and then press Finish
By default, when you start at virtual server a separate window will open with a Virtual Box Console. However, this console is quite restrictive and you might want to use a CMD console or a third party software such as MobaXterm so that you can easily copy and paste from the server to your local machine. In order to be able to do this you will need to set up the port forwarding.
In the VirtualBox console you will see the virtual servers on the left that you have created. Select the newly created server (In my case I am going to click on the last server I created Ubuntu-3)
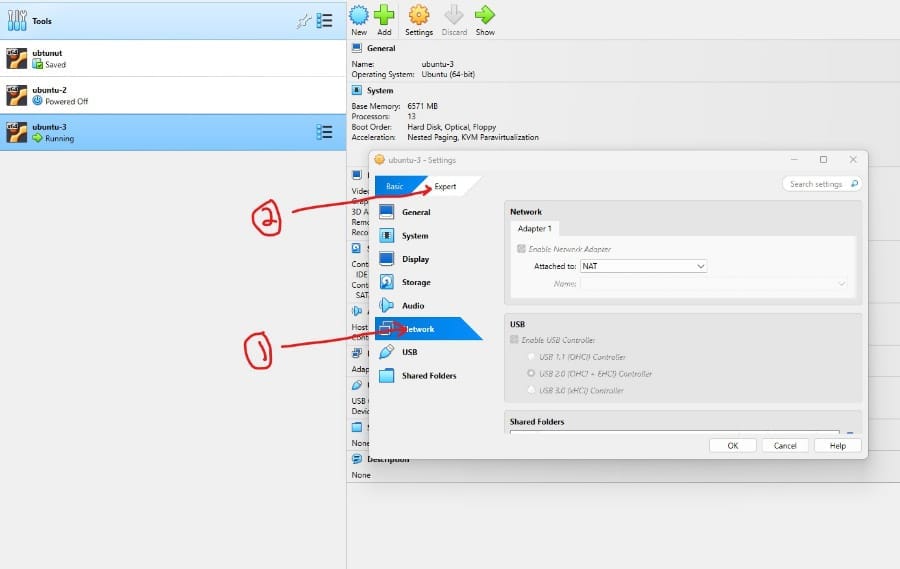
Select the Network option and then select Expert option.
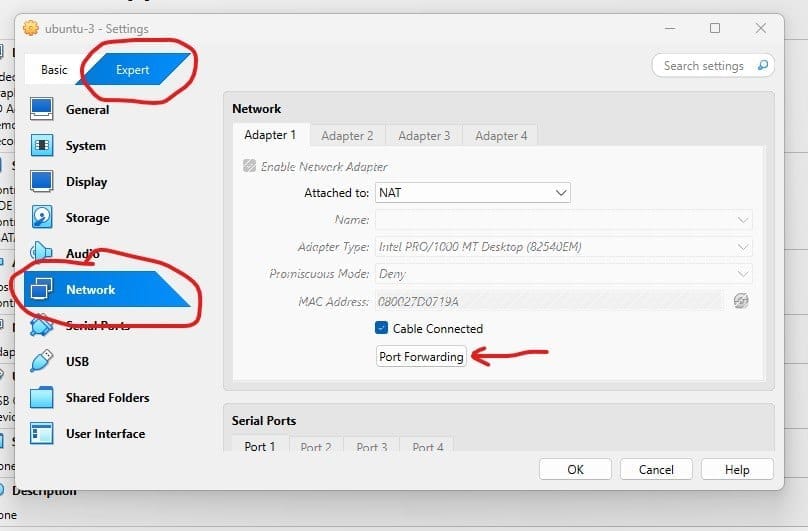
Click on the Port Forwarding option
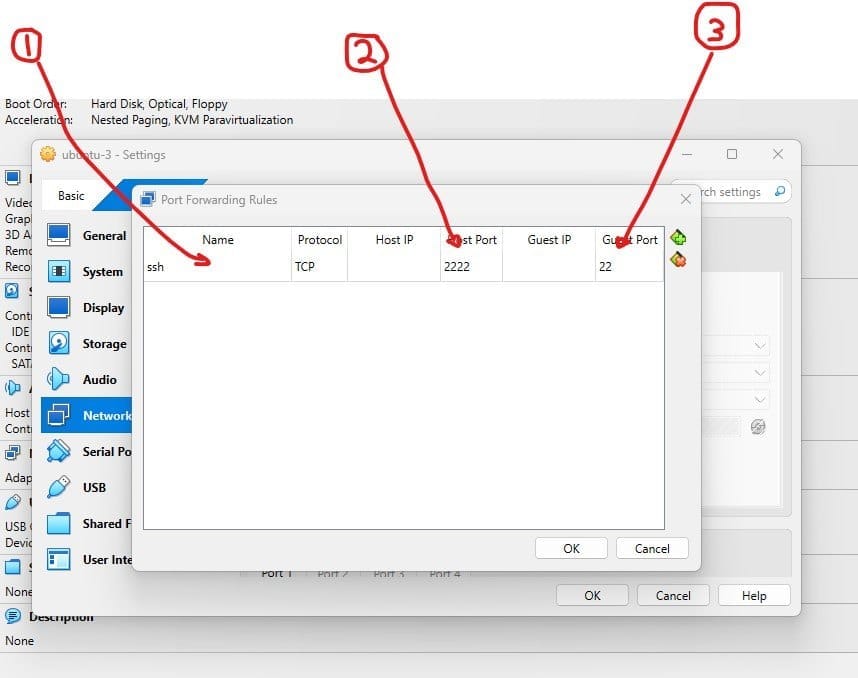
1) Name the rule
2) In Host Port add 2222
3) In Guest Port add 22 and then press OK to continue, when the window closes press OK again to confirm the changes.
We are now ready to run our server and install the AI!
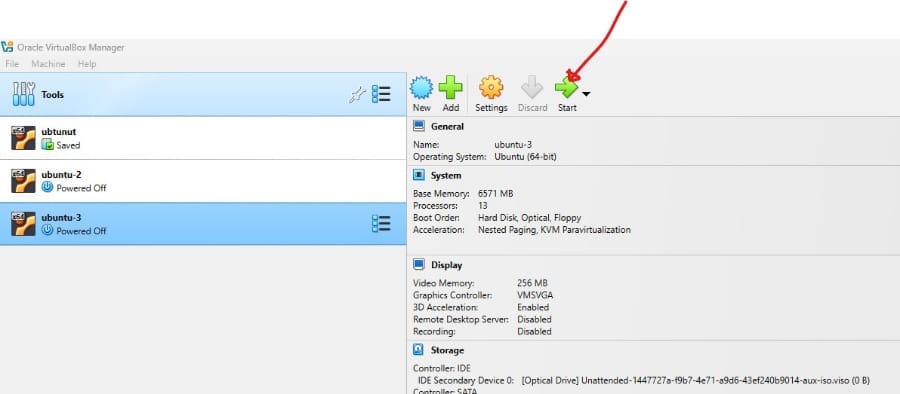
Head back to the VirtualBox console and click on the Start button and then select Normal Start. If this is the first time you are running the server, it will take a while to load.
When the server is loaded you will see the following screen with a login option. At this point you can use this default console, or you can open a CMD console or MobaXterm and type in the following command:
ssh -p 2222 username@localhost – replace the username with the name that you created when setting up the server.
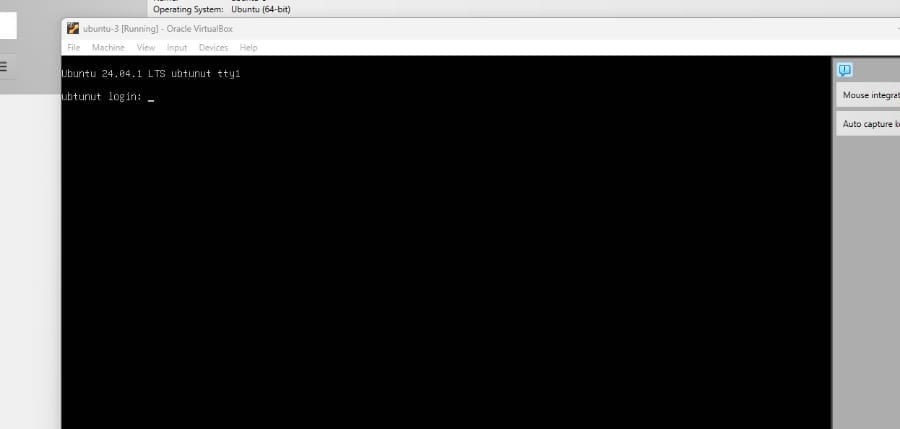
Login to the server
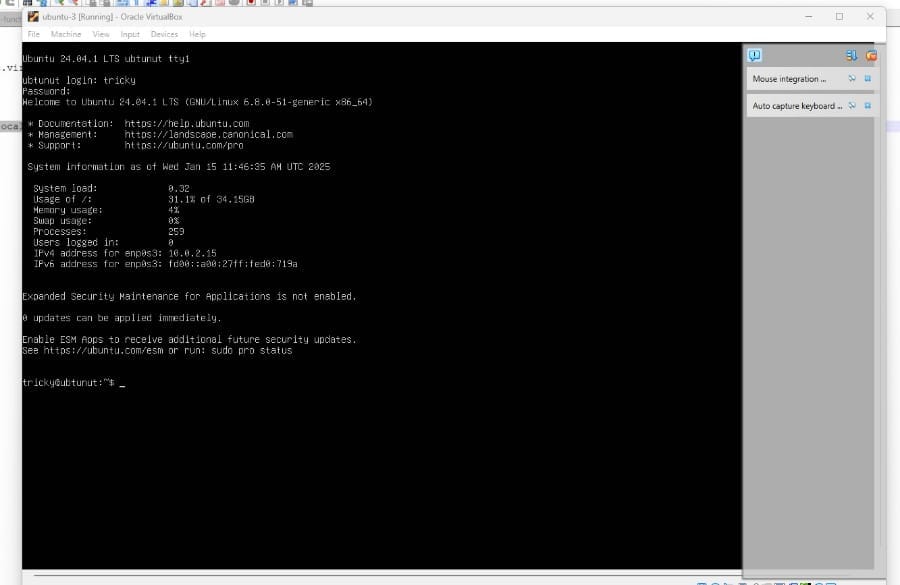
I have already updated this server but if this is the first time you have run it then you should update your server.
Type sudo apt update in the console to get the latest updates and then run sudo apt upgrade to install the updates. You might have to restart the server to implement the latest updates.
Now for the interesting part. Installing AI on your virtual machine!
Head over to the following website https://ollama.com/download/linux
Make sure the Linux option is selected, and you should see a line “Install with one command”
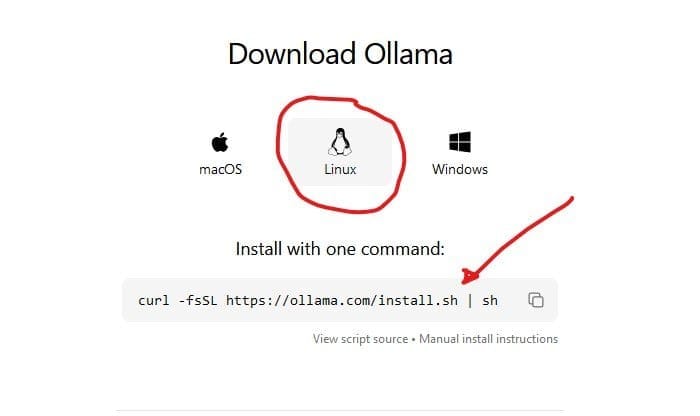
This will install Ollama AI on your machine. There are many different Ais available and if you head over to the following site https://huggingface.co to get a comprehensive list of all of the Ais available.
This might take a few minutes to load so be patient.
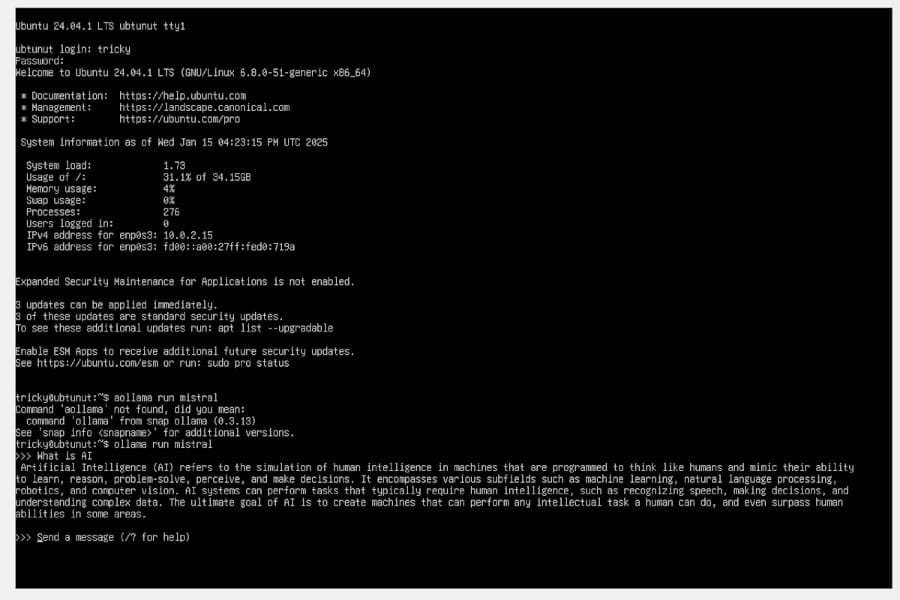
Now that you have the AI installed you will need to load a model. We are going to use the mistral model because it has a relatively small footprint but once again there are many different models to experiment with. Ollama Models.

Select the mistral Model and scroll down to the usage section.
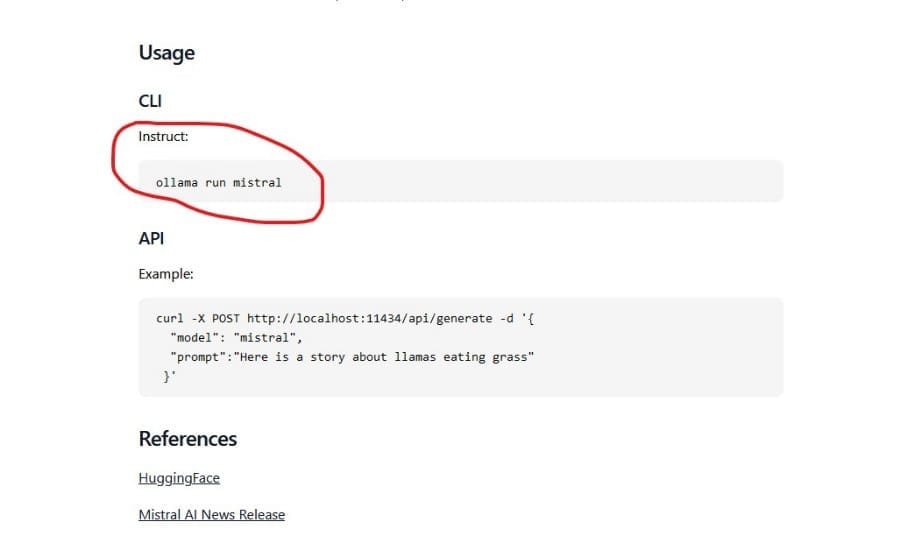
Navigate to your server console and run the following command
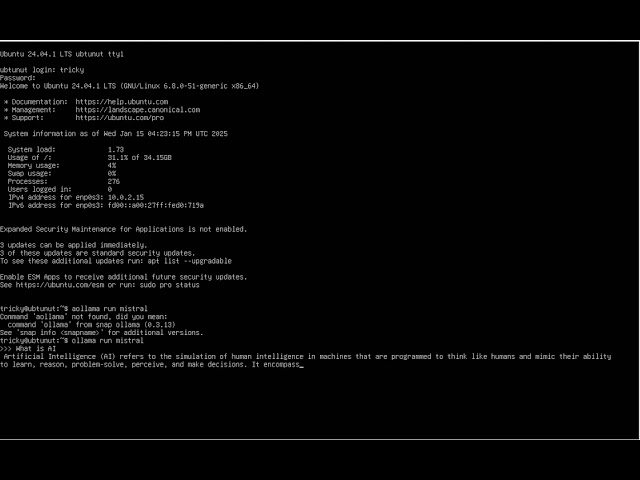
ollama run mistral and press enter
If this is the first time you have run mistral then it will first download the model. This may take up to 5 minus (based on your connection speed). Once it has loaded and is ready you will see. Click on the video below to see the AI working.

How to Use Virtual GPUs to Run AI - 2025 | Run Ollama on Virtual GPU | Use GPU in a Virtual Machine
YouTube Channel: Dan - Smart Tutorials

the ONLY way to run Deepseek...
YouTube Channel: NetworkChuck
Running AI on a VirtualBox setup
YouTube Channel: aifun

How to Download and Install VirtualBox on Windows 11 | 2024
YouTube Channel: Technoholic
At this point you are now ready to use the AI. Note when you run the AI this is not going to go off to ChatGTP or similar. Instead, it is actually going to run self-contained on your server. If you have set this up on a dedicated machine, then what this means is that you will now have access to AI even if you are not connected to the internet. If you have a good GPU and you are running it on a dedicated machine, then you will also get fast responses.
Why would you want to do this?
I would not recommend running AI on VirtualBox for full blown development unless you just want to see it works and test it. You will soon get frustrated with the speed if you are not using a dedicated machine with a high end GPU. However it is a great way to get into developing with AI without spending money on subscriptions and services. You can download different models and test them to find out what works best for you.
It also will give you an understanding of the requirements for hosting AI in the cloud. Unfortunately, you are not going to be able to use a cheap hosting package to get good performance. What you will realize is that you are going to need to use a GPU Server, and these are not cheap. So if you are opening up your AI to the general public then you will need to take into account the costs of having a GPU server running.
If you take the time to read the instructions, then you will see that there is API functionality which will allow you to connect to the AI from an app / web application which then means that you can develop your own AI systems.
If you are a developer and you want to secure your future, then I cannot emphasize this enough. YOU NEED TO LEARN TO WORK WITH AI. If you don’t then you put your future as a developer at risk. AI is not perfect and it can be very frustrating but there is no doubt that if you use AI to help you develop then it will become an invaluable tool which will take a lot of the monotony out of coding and help boost productivity. The same goes for working with your own AI and training it on your own data. These skills are going to in demand and you need to make sure your skills are up to the job. The good news is that all of the information is out there, free and just requires your time and effort to get it up and running. You do not need to spend thousands of pounds on high end equipment or sign up to expensive subscriptions if you run your own AI. This also includes AI imaging and animation. If you go to https://huggingface.co then you will find a huge range of models and AI that you can play with.
Actionable AI Articles
AI Questions and Answers section for Is it possible to run your own AI using VirtualBox and Ubuntu?
Welcome to a new feature where you can interact with our AI called Jeannie. You can ask her anything relating to this article. If this feature is available, you should see a small genie lamp above this text. Click on the lamp to start a chat or view the following questions that Jeannie has answered relating to Is it possible to run your own AI using VirtualBox and Ubuntu?.
Be the first to ask our Jeannie AI a question about this article
Look for the gold latern at the bottom right of your screen and click on it to enable Jeannie AI Chat.
Type: Article -> Category: Actionable AI


