Type: Article -> Category: Actionable AI
How to Run a Local AI Image Generator with Stability Matrix and Stable Diffusion
Publish Date: Last Updated: 25th June 2026
Author: nick smith- With the help of GROK3
The Evolution of AI Image Generation
AI image generation has transformed from a niche research field to a widely accessible technology, empowering creators to produce stunning visuals from text prompts. The journey began in the early 2010s with generative adversarial networks (GANs), introduced by Ian Goodfellow in 2014, which laid the groundwork for generating realistic images. However, early models required immense computational power, limiting their use to well-funded research labs with access to high-end servers.
The release of Stable Diffusion by Stability AI in August 2022 marked a pivotal moment. Unlike its cloud-based predecessors like DALL-E and Midjourney, Stable Diffusion was open-sourced under the CreativeML Open RAIL-M license, allowing developers and enthusiasts to run it on consumer hardware. This democratization sparked a wave of innovation, with tools like Lykos AI’s Stability Matrix simplifying the setup process for local AI image generation. Recent advances, such as optimized model compression and support for consumer GPUs, have made it feasible to run sophisticated models like Stable Diffusion and Flux on mid-range PCs, bringing professional-grade image generation to the masses.

Benefits of Running a Local AI Image Generator
Running an AI image generator locally offers several advantages over cloud-based alternatives:
-
Security and Privacy: Local generation keeps your prompts and images on your machine, eliminating the risk of data breaches or unauthorized access inherent in cloud services. This is crucial for sensitive or proprietary projects.
-
Unlimited Usage: Unlike cloud platforms that impose quotas or subscription fees, local setups allow unrestricted image generation, ideal for experimentation and high-volume projects.
-
Cost Efficiency: After the initial hardware investment, there are no recurring costs, unlike cloud services that charge per image or require monthly subscriptions.
-
Customization: Local setups let you fine-tune models, integrate custom checkpoints (e.g., from Hugging Face), and experiment with advanced features like LoRAs or ControlNet for tailored results.
-
Offline Capability: Once installed, Stability Matrix supports offline use, ensuring you can generate images without an internet connection, except for model downloads or updates.
Recommended Hardware Requirements
To run Stable Diffusion or Flux via Stability Matrix, your system should meet the following specifications:
-
RAM: Minimum 16GB, but 32GB is preferred for smoother performance, especially with demanding models like SDXL or Flux.
-
Graphics Card: NVIDIA GPU with at least 6GB VRAM for Stable Diffusion; 8GB to 16GB VRAM is required for Flux to handle higher resolutions and complex workflows.
-
CPU: A modern processor like an Intel i7 (13th Gen or equivalent) ensures efficient processing.
-
Storage: At least 20GB of free SSD space for models, software, and generated images.
For example, a laptop with an i7-13700H, NVIDIA RTX 3060 (6GB VRAM), and 16GB RAM can generate a 512x512 image in under 5 seconds using Stable Diffusion’s default model.
Step-by-Step Guide to Setting Up Stability Matrix and Stable Diffusion
Note (21/04/25): You will need a CUDA compatible GPU (NVIDIA) to run this installation out of the box. If your GPU is not CUDA compatible then this may not work on your device.
Follow these instructions to set up a local AI image generator using Lykos AI’s Stability Matrix, a user-friendly package manager that streamlines Stable Diffusion installation across Windows, Linux, and macOS.
Step 1: Download Stability Matrix
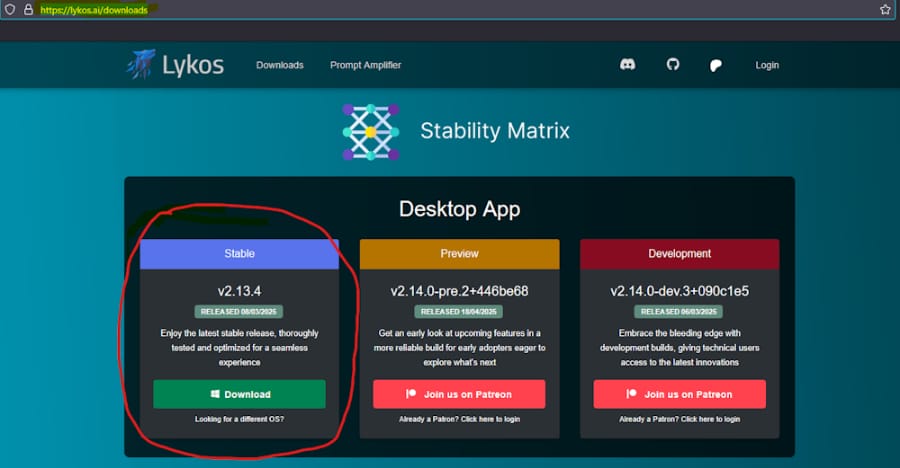
Visit https://lykos.ai/downloads and download the latest stable version of Stability Matrix for your operating system (Windows, Linux, or macOS). The download is free, though donations are appreciated.
Step 2: Extract and Launch
Unzip the downloaded folder to a location with sufficient storage (e.g., an SSD). Locate the executable file (StabilityMatrix.exe on Windows) and double-click to run it. No additional software is required.
Step 3: Install Stability Matrix
Follow the on-screen installation prompts. The process typically takes 5 to 15 minutes, depending on your internet speed, as it downloads dependencies like Python and the selected web UI. Ensure a stable internet connection to avoid interruptions, which can corrupt the installation.
Step 4: Select Stable Diffusion Package
During installation, choose the Stable Diffusion package (e.g., Automatic1111, ComfyUI, or Stable Diffusion WebUI Forge). Automatic1111 is recommended for beginners due to its intuitive interface, while ComfyUI suits advanced users needing custom workflows.
Step 5: Configure Data Directory
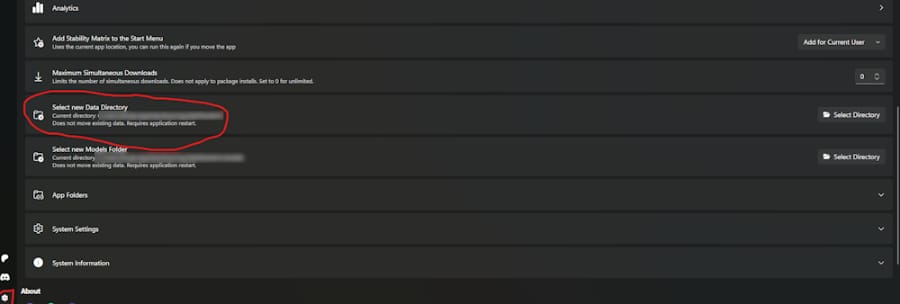
In the settings menu, set the Data Directory to store models and outputs. Accept the default option unless you have a specific reason to change it (e.g., using a secondary drive). This folder will house checkpoints, LoRAs, and generated images.
Step 6: Restart Stability Matrix
After setting the Data Directory, restart the software as prompted to apply the changes. This ensures all components load correctly.
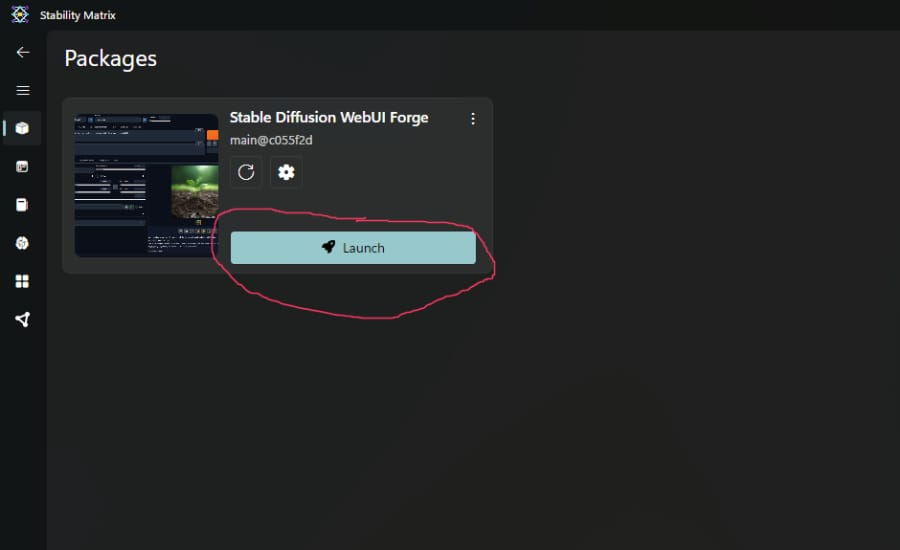
Step 7: Launch Stable Diffusion
Open Stability Matrix, select the Stable Diffusion package, and click “Start.” This launches the web UI for the chosen package.
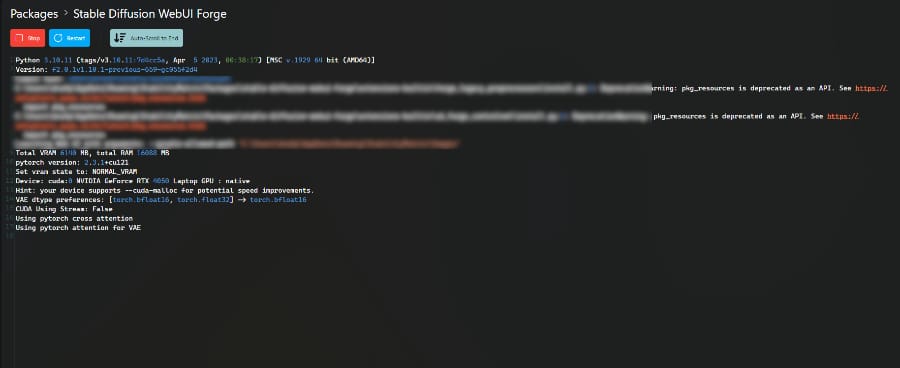
Step 8: Access the Web Interface
A browser window will open at http://127.0.0.1:7860/. If it doesn’t, manually enter the address in your browser. This local server runs the Stable Diffusion interface.With a i7 Laptop, 16 Gig Ram and NVIDIA 6 GB GPU it took me less than 5 seconds to generate a image.
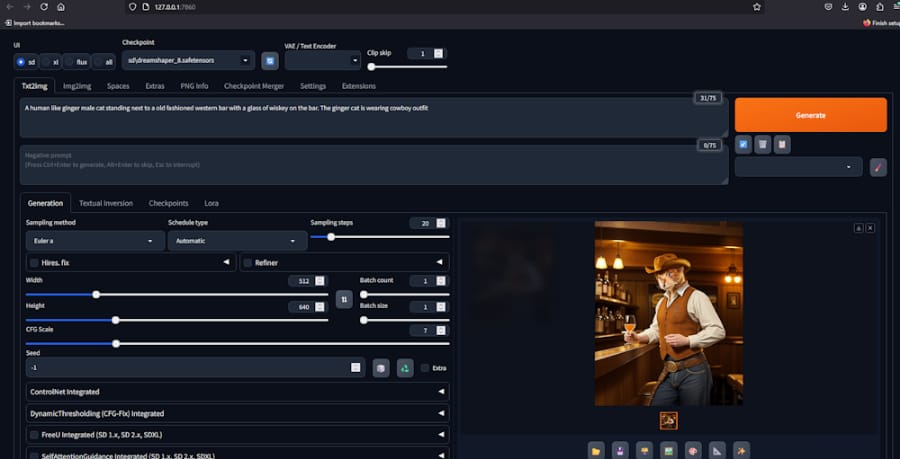
Step 9: Generate Your First Image
In the web UI, enter a text prompt describing the image (e.g., “a futuristic city at sunset, cyberpunk style”). Adjust settings like sampling method (Euler a or DPM++ 2M Karras) and steps (20–30 for a balance of speed and quality). Click “Generate” to create your image.
Step 10: Enjoy Unlimited Creativity
Watch your image materialize in seconds! With no restrictions on generation limits, you can experiment freely. On a system with an i7-13700H, NVIDIA RTX 3060 (6GB), and 16GB RAM, a 512x512 image takes less than 5 seconds using the default model.
Advancing Your Setup: Exploring Flux and Custom Models
Once comfortable with the basics, enhance your setup by downloading advanced models from Hugging Face. For instance, Flux.1, a high-performance model, delivers superior quality but requires an 8GB VRAM GPU. To install:
-
Download the Flux.1 checkpoint from Hugging Face.
-
Place it in the Stability Matrix Data Directory under Data/Models/StableDiffusion/.
-
In Stability Matrix, select the new model from the checkpoint browser and generate as usual.
Explore other models like DreamShaper XL or SDXL for specific styles, ensuring your hardware meets their VRAM requirements (e.g., 8GB for SDXL).
Performance Optimization Tips
-
NVIDIA GPUs: Ensure the latest drivers are installed for CUDA support, which accelerates generation.
-
Low VRAM: If using a 6GB GPU, enable --lowvram in Stability Matrix’s extra launch options for Stable Diffusion to optimize memory usage.
-
Sampling Settings: Use 20–30 steps with Euler a or DPM++ 2M Karras for a balance of speed and quality. Higher steps (50+) improve detail but slow generation.
-
Resolution: Stick to 512x512 or 768x768 to avoid VRAM issues. Use Hires Fix for larger images without distortion.
Recent Advances in Local AI Image Generation
Recent developments have made local AI image generation more accessible:
-
Stability Matrix Updates: The December 2024 release introduced .NET 9 and Avalonia 11.2.2, improving startup performance and reducing memory usage. It also added support for Flux model downloads and enhanced CivitAI integration.
-
Model Optimization: Tools like Microsoft Olive optimize Stable Diffusion for AMD GPUs, achieving up to 9.9x faster generation by converting models to ONNX and reducing precision to 16-bit floats.
-
Community Contributions: The open-source community continuously releases new checkpoints, LoRAs, and extensions, expanding creative possibilities.
Conclusion: Unleash Your Creativity
With Stability Matrix and Stable Diffusion, running a local AI image generator is now within reach for anyone with a moderately powerful PC. The setup is straightforward, the benefits are compelling, and the creative potential is limitless. Whether you’re an artist, designer, or hobbyist, your imagination is the only constraint. Start generating today, and explore the vibrant Stable Diffusion community on platforms like Hugging Face and Reddit for inspiration and advanced techniques.

This article as a Video Cast
🎨 Run Your Own AI Image Generator Locally with Stability Matrix & Stable Diffusion! #localai
YouTube Channel: aifun
This video cast was created using the information from our article on how to use AI to create podcast content.
Interested in AI? Check out some of these great Actionable AI Articles
Training Grok to Write Like You: A Detailed Guide
Grok, created by xAI, is a powerful AI designed to provide helpful and truthful answers, with a unique voice inspired by figures...

How to Create AI Videos in Minutes with Video GPT and VEED: A Step-by-Step Guide for Content Creators
If you want to create a video that can be made from stock images, video and is straight forward then this combination of ChatGPT...
How to Build a Multimodal AI Model: Step-by-Step Tutorial for Beginners
In today’s AI world, it’s no longer enough for machines to just read or see, they need to do both (and more). That’s where...
How to Create an AI Sprite Sheet: A Step-by-Step Guide for Game Developers
If you’re searching for a foolproof, one-click solution to create sprite sheets with AI, brace yourself for a bit of...
How to Train Your Own Local AI on Your Data
In the age of artificial intelligence, having a personalized AI trained on your own data is becoming increasingly accessible and...
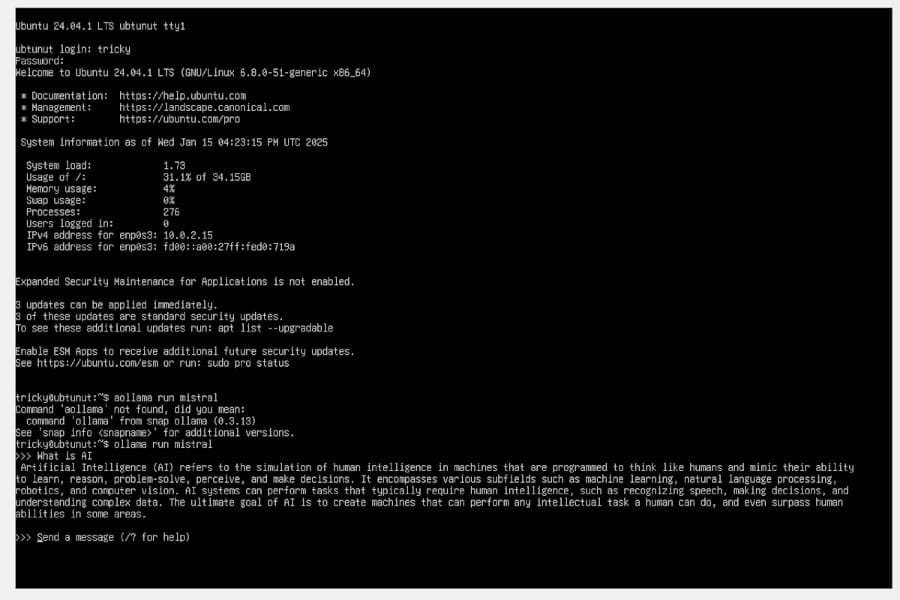
Is it possible to run your own AI using VirtualBox and Ubuntu?
I have been looking into implementing AI into my website and whilst there are many out the box options, almost all of them require...

A Newbie’s Guide to AI Animation: Myths, Facts, and Hilarious Realities
Let’s face it: AI animation is the new kid on the block, and everyone wants a piece of the action. But before you dive in thinking...

How to Get the Most Out of ChatGPT
ChatGPT, powered by OpenAI, has evolved into one of the most powerful and versatile AI tools. From assisting with content creation...

AI Questions and Answers section for How to Run a Local AI Image Generator with Stability Matrix and Stable Diffusion
Welcome to a new feature where you can interact with our AI called Jeannie. You can ask her anything relating to this article. If this feature is available, you should see a small genie lamp above this text. Click on the lamp to start a chat or view the following questions that Jeannie has answered relating to How to Run a Local AI Image Generator with Stability Matrix and Stable Diffusion.
Be the first to ask our Jeannie AI a question about this article
Look for the gold latern at the bottom right of your screen and click on it to enable Jeannie AI Chat.
Type: Article -> Category: Actionable AI